
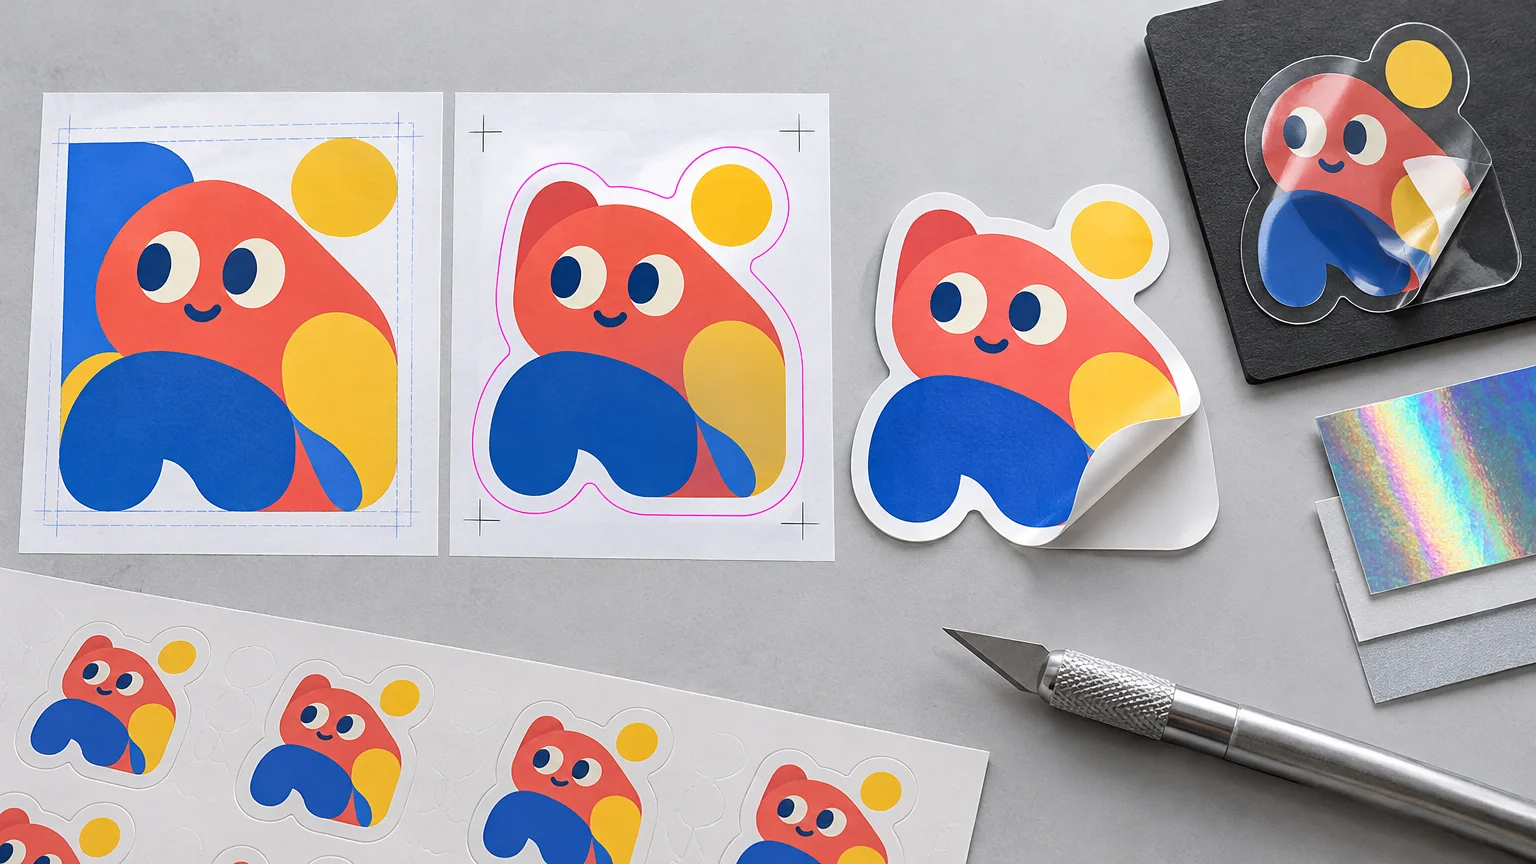
CustomStickers.com Production Review: What the Proofing and Cut Workflow Gets Right
The useful answer is that the CustomStickers production proofing cut workflow is well suited to ordinary custom-shaped sticker jobs when the buyer treats the digital proof as a production approval, not a cosmetic preview. The workflow gives customers an opportunity to review the artwork and contour, request revisions and approve the result before production. That is the right control structure for an operator-assisted print-and-cut service. It does not, however, remove the buyer’s responsibility to inspect what the operator has interpreted.
From a production perspective, the strongest part of the CustomStickers production proofing cut workflow is the checkpoint between artwork upload and manufacturing. CustomStickers normally creates the cut line, while advanced Illustrator users can submit their own contour on a separate layer. The service is therefore accessible to buyers without dieline experience but still permits more deliberate control when the shape must follow an exact path.
My recommendation is to use custom sticker printing for standard white, clear or holographic projects when you can actively manage the proof. Contact the company before ordering if your job depends on a named film, a particular adhesive, a physical contract proof, a quantified cutting tolerance or documented performance on a difficult surface. Those details are not established by the supplied public documentation.
How the production workflow should be understood
The practical sequence is straightforward: choose the sticker format, size, material and finish; upload the artwork; communicate any special contour requirements; inspect the supplied proof; request corrections or approve it; then let the job proceed to printing and cutting. CustomStickers states that customers can request and approve a proof before production. Its published material also provides for automatic approval when a proof receives no response, although the supplied product information and FAQ conflict on whether that happens after three days or two business days. Follow the deadline displayed in your checkout terms and proof email rather than relying on a general recollection.
This is best described as an operator-assisted workflow because the vendor may interpret the artwork and construct the contour. That is useful when a customer uploads a flattened PNG or JPEG, but it means the first proof may contain a production decision the customer never explicitly made. A designer may see a mascot on a transparent background; an operator must decide whether to trace every projection, simplify the silhouette, bridge narrow gaps or add a surrounding border.
The public documentation reviewed here does not identify the printer, cutter, RIP, calibration method, ICC profile or numerical print-to-cut registration tolerance. The proof can therefore show intended construction, but it should not be read as a measurement certificate for the final cut. A 0.03-inch artwork extension or inset is an artwork rule, not evidence that a cutter will hold registration to 0.03 inch.
Let the operator create the contour—or supply your own
Let CustomStickers create the cut line when the artwork has a simple silhouette and a reasonable border. Circles, rounded rectangles, uncomplicated logos and bold character shapes generally leave little room for interpretation. Put the desired finished dimensions in the order and use the proof to confirm how the contour was drawn.
Supply a vector cut path when exact contour control is part of the design. Examples include a sticker that must align with another component, a shape with intentional interior openings, a carefully measured border, or artwork whose small projections should be simplified in a specific way. CustomStickers instructs advanced Adobe Illustrator users to organize the file with separate Artwork and Cut Line layers.
The cut line should be a closed vector path rather than a collection of ordinary printer’s marks. Adobe distinguishes editable crop or trim marks from output trim marks, and neither automatically communicates a custom contour around an irregular sticker. Adobe’s Illustrator trim-mark documentation is useful for understanding that distinction. A contour-cut path is a manufacturing instruction that must identify the intended perimeter; crop marks merely indicate conventional trimming or alignment.
- Name the contour layer clearly, such as Cut Line.
- Use one closed path for the intended outer perimeter unless the vendor has confirmed support for additional cuts.
- Keep artwork and cutting geometry on separate layers.
- Remove duplicate paths, hidden contours and abandoned shape experiments.
- Do not assume a clipping mask, transparent canvas edge or Photoshop selection will be interpreted as the requested cut.
- Describe any required internal holes or unusually narrow sections in the order notes and confirm them in the proof.
Full bleed and deliberate borders require different files
CustomStickers’ guidance distinguishes artwork intended to run through the cut from artwork intended to retain a visible border. For full bleed, it says the cut line is brought approximately 0.03 inch inside the artwork. For bordered designs, it recommends at least 0.05 inch between the artwork and cut line. These are approximately 0.76 mm and 1.27 mm respectively, based on 25.4 mm per inch.
| Construction | File and proof requirement | Primary failure to check |
|---|---|---|
| Full-bleed sticker | Extend expendable color or imagery beyond the intended contour; confirm that the proof places the cut about 0.03 inch inside the artwork. | A sliver of unprinted substrate caused by artwork ending at the contour. |
| Sticker with a deliberate border | Keep important artwork at least 0.05 inch inside the contour and inspect the border around the complete shape. | A visibly uneven border caused by small registration movement. |
| Borderless sticker with critical edge detail | Move lettering, faces, QR modules and other essential details farther inward than the bleed allowance. | Important content being clipped even though color still reaches the edge. |
Do not substitute a generic commercial-print bleed value without checking the product instructions. The common 0.125-inch bleed used for many trimmed sheets is not automatically the correct setup for a small contour-cut sticker. Our broader guide to setting print bleed explains why the production template or printer specification takes precedence over a general default.
Die cut, kiss cut and fragile geometry
A die-cut sticker is cut through the face material and backing so the supplied piece follows the contour. A kiss-cut sticker has a face cut while remaining on a larger liner or surrounding field. The latter can make intricate stickers easier to handle and peel because delicate projections remain supported until application.
CustomStickers lists a minimum size of 0.75 by 0.75 inch for die-cut stickers and 0.5 by 0.5 inch for kiss-cut stickers. It also recommends linework of at least 0.5 point. These thresholds establish orderability, not a guarantee that every feature at the limit will be visually strong or mechanically robust.
Overall dimensions tell only part of the story. A three-inch sticker can still contain a 0.03-inch neck, a needle-like corner or a tiny isolated island. Those details may be difficult to cut, weed, peel or apply even though the overall sticker is comfortably above the stated minimum. Look for acute points, deep inward notches, narrow bridges and small internal holes. Simplifying one troublesome node often improves the physical result without visibly changing the illustration.
Treat the proof as the final prepress checkpoint
A proof is valuable only if it is reviewed at production scale and against the order specification. The essential question is not simply, “Does this look like my picture?” It is, “Does this proof describe the object I intend to receive?”
- Confirm the finished width and height, including whether the quoted size refers to the artwork or outer cut dimensions.
- Trace the entire contour visually. Check projections, gaps, corners, bridges and any intended internal holes.
- Verify that full-bleed artwork extends beyond the cut and that expendable edge content can be lost safely.
- Inspect deliberate borders for adequate width and visual consistency.
- Keep text, faces, QR codes and other functional details away from the cut.
- Confirm die cut versus kiss cut, material, finish and quantity.
- For clear material, identify which areas should remain transparent, print as color or print as visible white.
- For holographic material, confirm which artwork areas should reveal the reflective base.
- Request a revision for any ambiguity rather than approving with an explanatory email afterward.
- Approve or revise before the deadline stated in the proof email so the order is not released automatically.
If a QR code is included, evaluate more than whether it appears on the proof. Its quiet zone must remain clear, and it should be tested at the intended physical size. Laminate glare, substrate effects, print gain and application to a curved surface can all affect scanning in ways that an enlarged on-screen preview does not show.
An independent hands-on comparison can add observations about ordering and received samples, but it cannot establish a universal cutting tolerance or predict every future batch. PrintReviewer reports its own side-by-side ordering observations involving CustomStickers in a hands-on sticker vendor comparison. Those results are useful purchasing context, not factory-wide process capability data. For a broader decision framework, see our guide to choosing a sticker company for the actual use case.
Material choice changes what the artwork means
White vinyl
White vinyl is the least ambiguous choice for ordinary full-color art because the substrate provides a consistent light background. It is the sensible starting point for logos, illustrated stickers and brand colors when transparency or a metallic effect is not part of the concept. Color can still vary with profiles, inks and production conditions, so screen appearance is not a contract color target. Our explanation of RGB, CMYK and print conversion covers the larger color-management issue.
Clear vinyl and white ink
Clear stock introduces three different states: unprinted transparency, color printed with a white underbase, and visible white artwork. CustomStickers says it prints white beneath printed areas to improve opacity and warns that colors on clear stickers can appear less bright than on white vinyl because printing inks are translucent.
That makes explicit artwork instructions important. A checkerboard background in design software only represents transparency; it is not printable artwork. A white object is artwork, but it will disappear from a conventional composite preview if it is shown against white. White ink is a production channel or treatment, not merely the presence of white pixels. The distinctions are explored further in our guide to transparent files, white artwork and white ink.
Holographic vinyl
CustomStickers describes its holographic material as a reflective silver-based stock with a gloss finish by default. It also warns that the substrate can alter or mute printed colors and does not guarantee exact color matching on that material. That makes holographic vinyl effective when the changing reflective base is part of the design, but a poor default for pale colors or tightly controlled brand matching.
Use the proof to confirm the placement of printed and exposed holographic areas, but remember that a static digital proof cannot reproduce the angle-dependent appearance of a reflective film. If a specific color relationship is critical, a small production order is more informative than judging the effect solely on screen.
Worked example: a three-inch full-bleed mascot
Consider a three-inch die-cut mascot with ears, a tail and a dark background that should reach the edge. Start with a clean vector silhouette or high-resolution artwork. Extend the dark background beyond the desired perimeter so the edge contains expendable image area. Keep the face, lettering and other critical features safely inside the contour.
If the exact silhouette matters, create a closed vector path on a separate Cut Line layer. Simplify very sharp fur points and inspect narrow gaps between the limbs and body. On the proof, confirm the three-inch final size, trace the operator’s contour, verify that the cut sits inside the extended artwork, and check that no facial feature has moved into the edge-risk area. If a white border is added instead, provide enough separation to satisfy the published 0.05-inch guidance and preferably more where uniformity is visually critical.
Finally, confirm the material and finish before approving. The same mascot will behave differently on white vinyl, clear vinyl with a white underbase, and reflective holographic stock. Approval should occur only after the proof communicates the intended physical construction—not merely after it displays the right illustration.
The production-minded recommendation
CustomStickers is a practical option for standard custom shapes because it combines operator-created contours with a customer approval stage and permits advanced users to supply separate cut geometry. The workflow gets the important sequence right: interpret the file, expose that interpretation in a proof and allow correction before manufacturing.
Use it confidently for conventional white, clear or holographic projects when you are prepared to review size, contour, bleed, border spacing, material behavior and white-ink intent. Start with a smaller order when appearance is sensitive, then use the approved construction as the basis for a larger reorder.
Ask questions before ordering when success depends on adhesive chemistry, removability, temperature or chemical resistance, a named film construction, a physical contract proof, exact brand-color matching or a quantified cutting tolerance. For an ordinary sticker, the digital proof is an effective control point. For a demanding engineering application, it is the beginning of specification—not a substitute for one.
References
- Custom Vinyl Stickers | Waterproof and Durable – CustomStickers.com
- Die Cut Sheet Labels | Quality Packaging and Product Labels – CustomStickers.com
- FAQ – CustomStickers.com
- Holographic Stickers | Die Cut Stickers | CustomStickers.com
- Clear Stickers | High Quality Transparent Stickers | CustomStickers.com
- Clear Stickers: How to Use White Ink Correctly – CustomStickers.com
- How to specify crop marks for trimming or aligning in Illustrator | Illustrator
- Make Stickers vs Sticker Mule vs CustomStickers.com: Which Custom Sticker Shop Is Actually Worth It? – The Print Reviewer